Contents
Chapter 04
New application
The loan agreement you sign is what governs your loan. This guide explains how to use the website; where the two ever differ, your signed agreement prevails.
Six steps, about ten minutes. Your answers are saved as you go, so you can stop and come back — but only in the same browser on the same device, and not everything is kept (see If you stop halfway below).
Section 01
Apply, step by step
The six steps at a glance; each is explained in full below.
Have these ready
- Your MyKad, front and back (photographed live)
- A payslip, EPF statement or 3 months of bank statements
- A bank account in your own name
Account
filled in from your account
Personal
family, education and address
Employment
your job and income
Loan
amount, period and account
Documents
MyKad photos and one document
Review & Submit
check, consent, submit
Section 02
Two things checked before the form opens
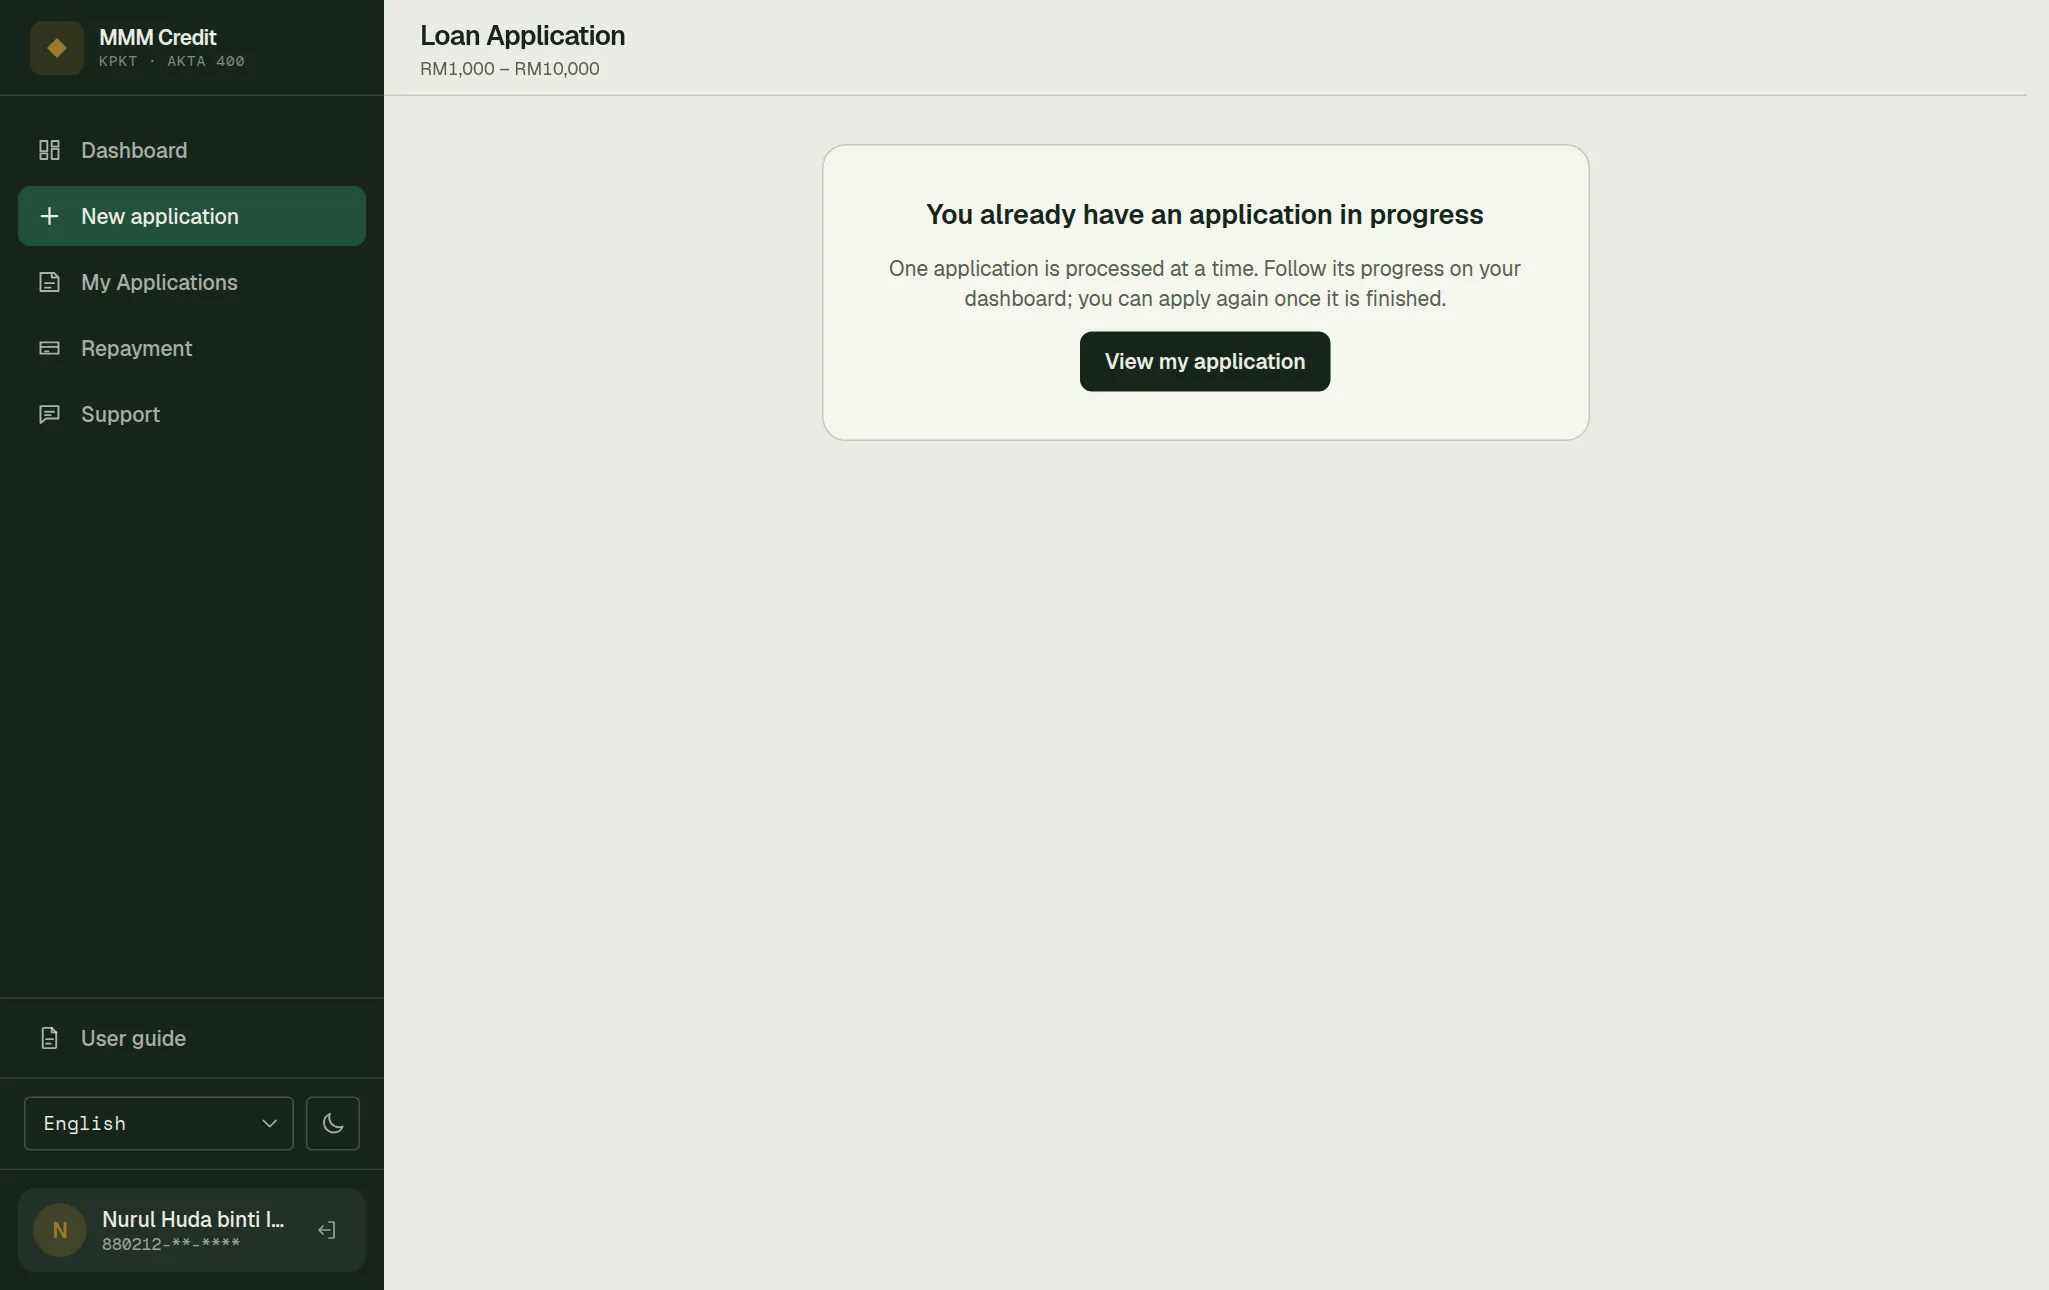
Can you apply right now? If you already have an application in progress, you see a card saying so, with a View my application button that takes you to your dashboard — we handle one at a time. If a loan was disbursed to you recently, the card says "You can apply again from {date}", with a Back to my account button. If we cannot open a new application for you for another reason, the page says so and offers Contact us; our team can explain, the website cannot.
Is your email address verified? If not, you are stopped here with a short card asking you to verify it. You only see this card if your account was created by our staff, or opened before the registration page verified email addresses — registering today verifies it already. The email address matters from here on, because that is how we reach you about your account — our replies to your tickets and our notices about your loan go there. Verifying takes a minute, right there on the card — press Send verification code and type in the code — and then the application form opens.
Both checks happen before the form rather than at the end. Finding out at step 6 that you could not have applied would waste the whole ten minutes.
Section 03
If you stop halfway
When you come back, the form says "Your saved application has been restored." Press Start over if you would rather begin again with an empty form.
For your safety, some things are never saved: your MyKad photos, your supporting documents and your bank account number. You will be asked for those again. Logging out also clears the saved answers, so the next person to use the same device cannot see them.
Section 04
Step 1 — Account
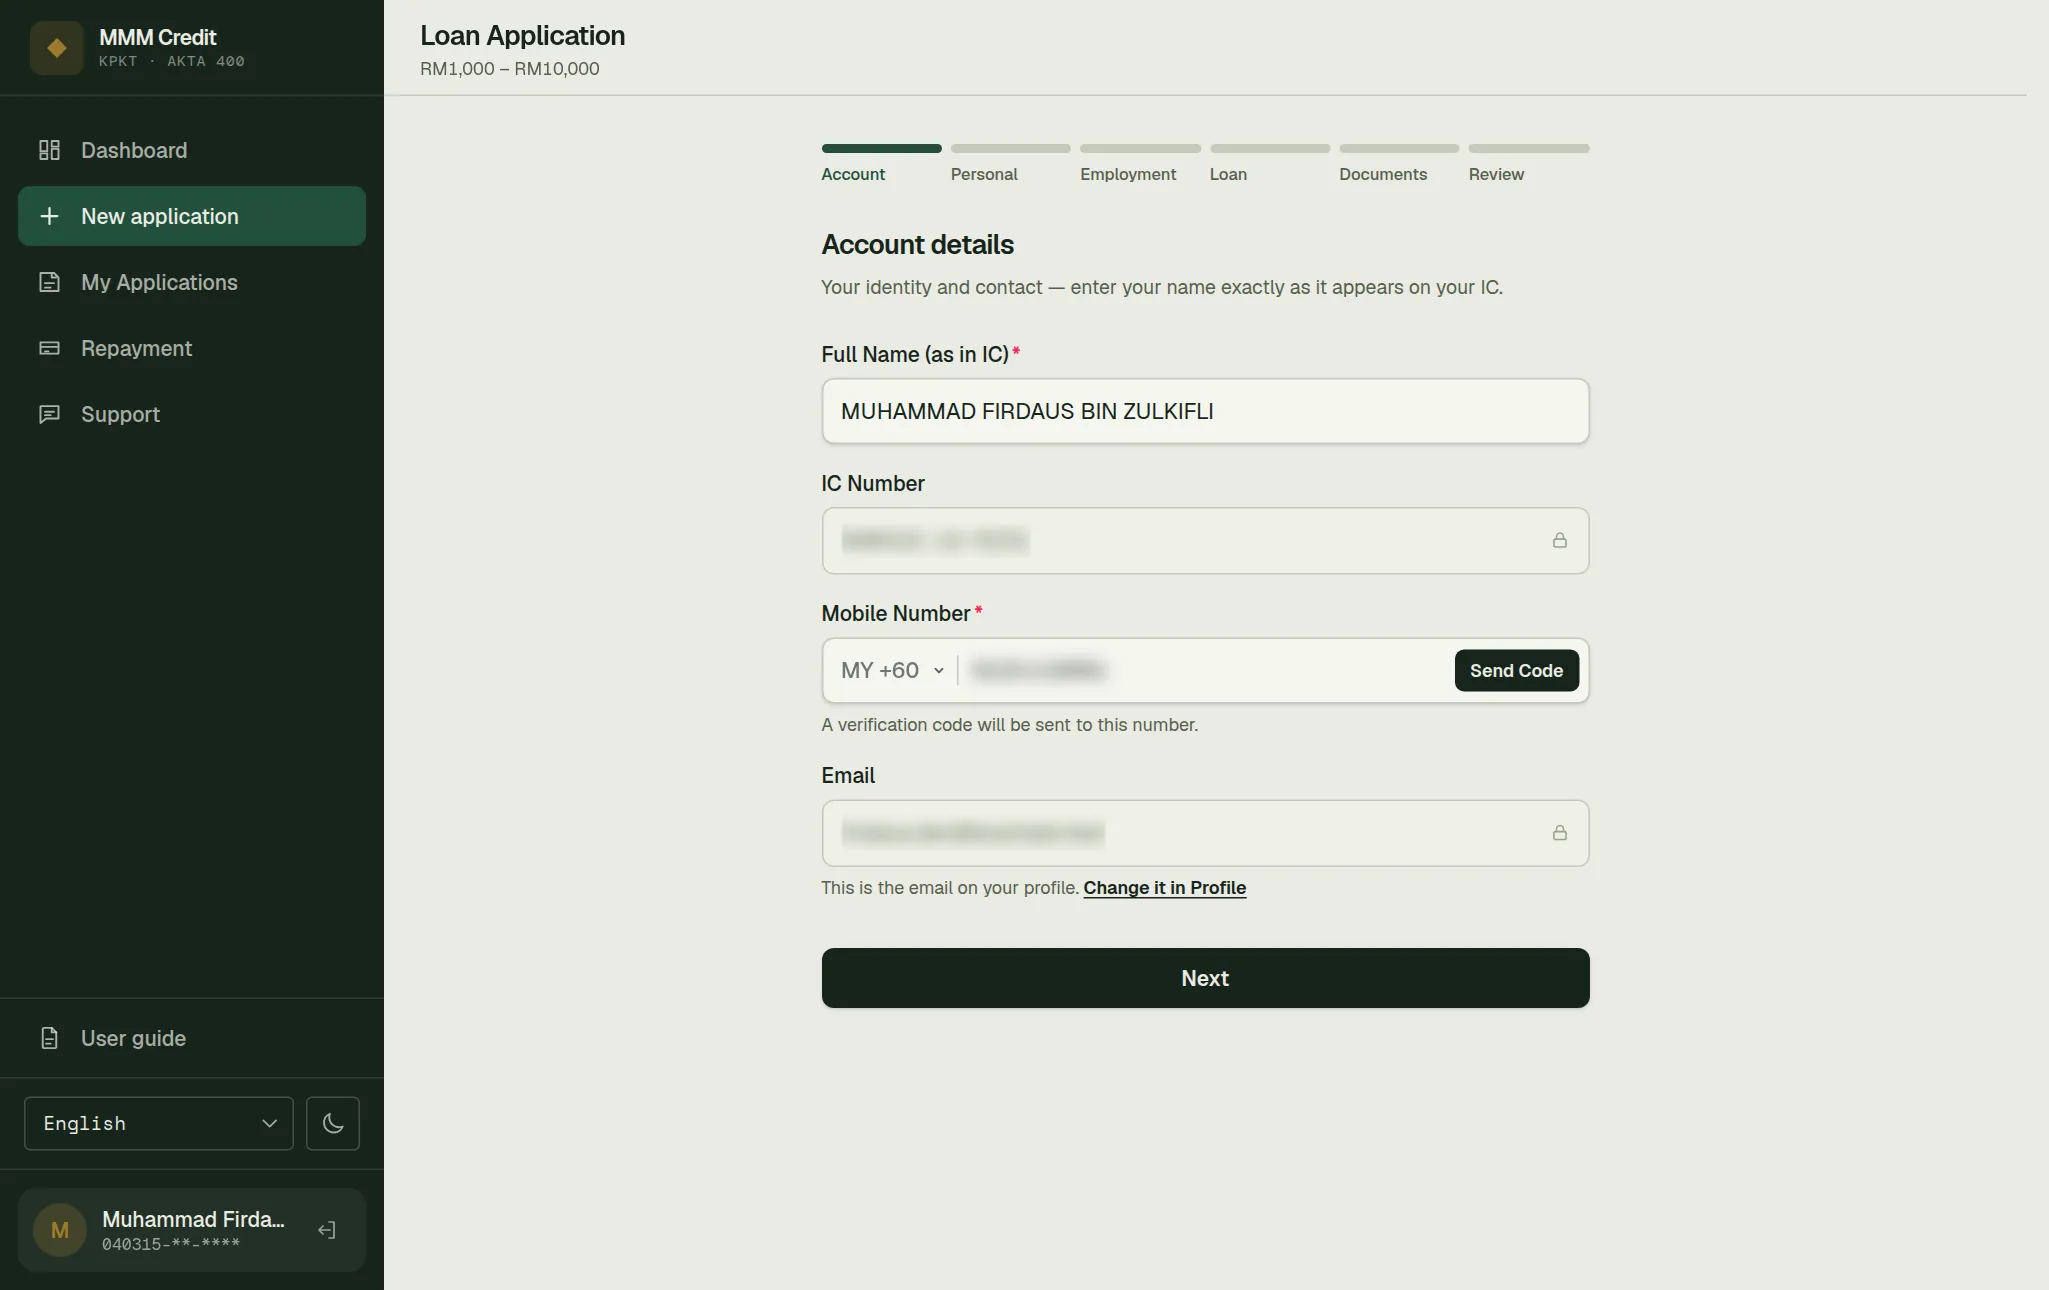
Your name, IC number, phone and email, already filled in from your account and not editable here. If any of it is wrong, stop and fix it in My account first (or open a ticket under Support, for the fields only staff can change).
You will normally be asked to confirm your phone number again: press Send Code, type in the code we send by SMS to the phone number already on your account, and press Verify.
Section 05
Step 2 — Personal
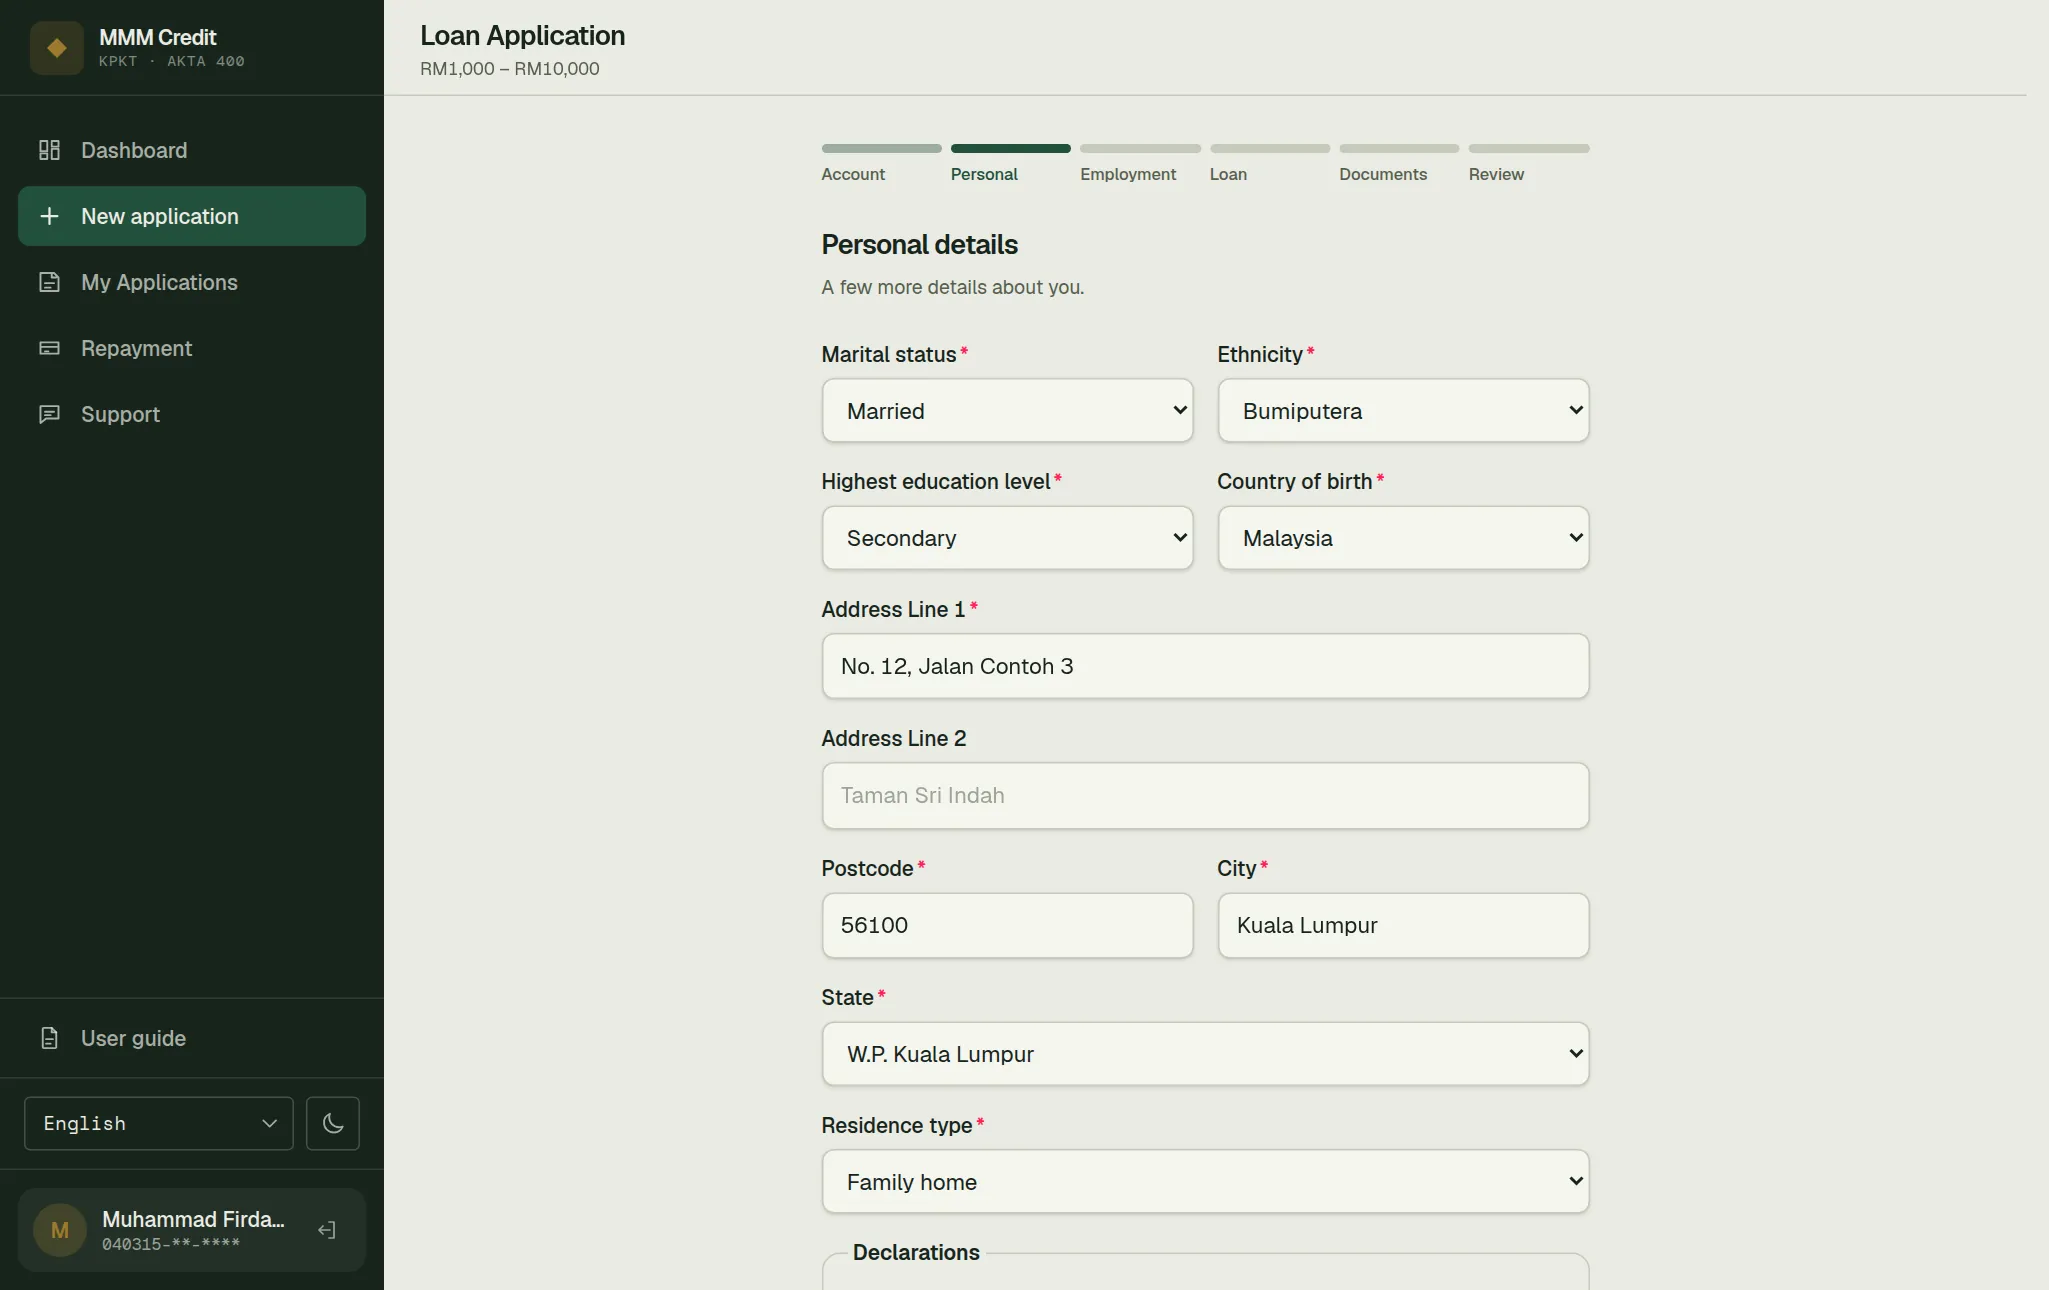
Marital status, Ethnicity, Highest education level and Country of birth, then your home address: Address Line 1, Address Line 2 (optional), Postcode, City, State and Residence type. Your date of birth is not asked for — it is already in your IC number.
Note that this is your address for this application, not a setting on your account. If you move, it is the next application that asks again.
The three declarations
At the bottom of the step, a box headed Declarations holds three statements, each answered True or False:
- I do not stay in the US.
- I do not hold US citizenship.
- I am not a politician, nor related to one (PEP).
Read them carefully, because they are written in the negative. Answering False means the thing does apply to you — that you do stay in the US, hold US citizenship, or are a politically exposed person.
Answering False does not reject your application. The box says so itself. It means we may have to verify more before deciding, because these are things Malaysian law requires a lender to ask about. There is no default answer to any of the three: you have to choose, and the step will not move on until you have. Answering to make the form easier is the one genuinely bad outcome here — it is a false declaration, and step 6 asks you to confirm that everything you entered is true.
Section 06
Step 3 — Employment
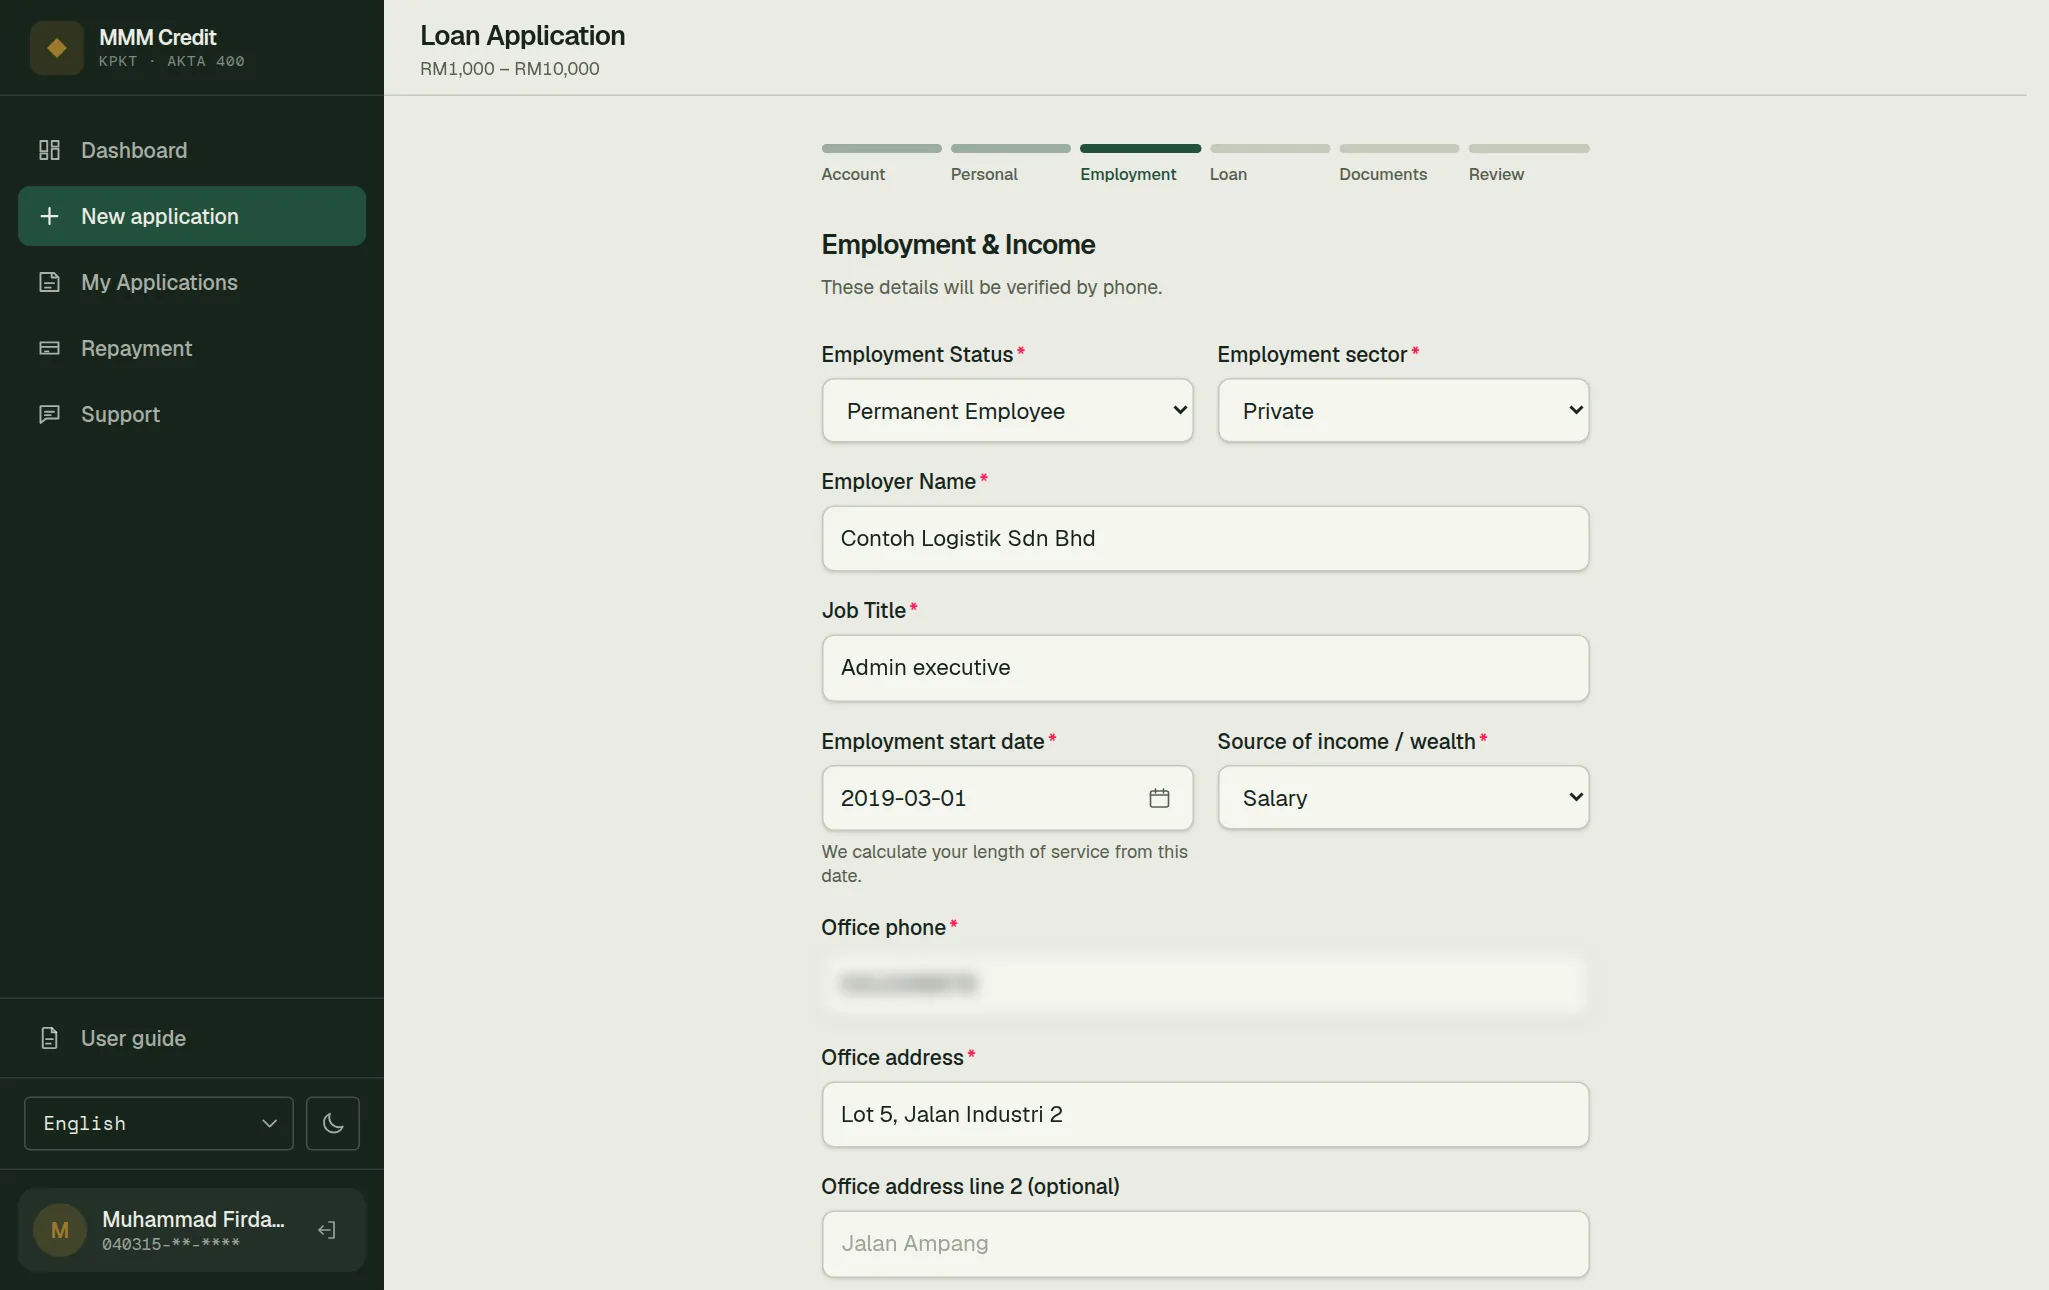
Headed Employment & Income, and the subtitle tells you what happens with it: "These details will be verified by phone."
Employment Status first, because it changes the labels below it: an employee is asked for Employer Name, someone self-employed for Business Name, a pensioner for Former Employer. Then Employment sector, Job Title, Employment start date (or Business start date) and Source of income / wealth.
Office phone and Office address are required, with one exception: if you picked Pensioner, who has no office, the whole block is marked optional and you may leave it empty. State is picked from the same list of states as your home address, not typed in. The second address line is optional for everyone.
Then the two figures the assessment turns on:
- Net Monthly Income — after EPF, SOCSO and tax, as the hint under the box says. Not your gross salary.
- Total Monthly Commitments — car, housing and personal loan instalments plus the minimum payments on your credit cards. If you have none, enter 0 rather than leaving it empty.
You are not asked how long you have worked there: we work that out from the start date.
Answer these two accurately. Understating your commitments does not help you — it produces a repayment you cannot comfortably meet. The step ends with the warning that false information will result in rejection and will be recorded, and that is exactly what it means.
Section 07
Step 4 — Loan
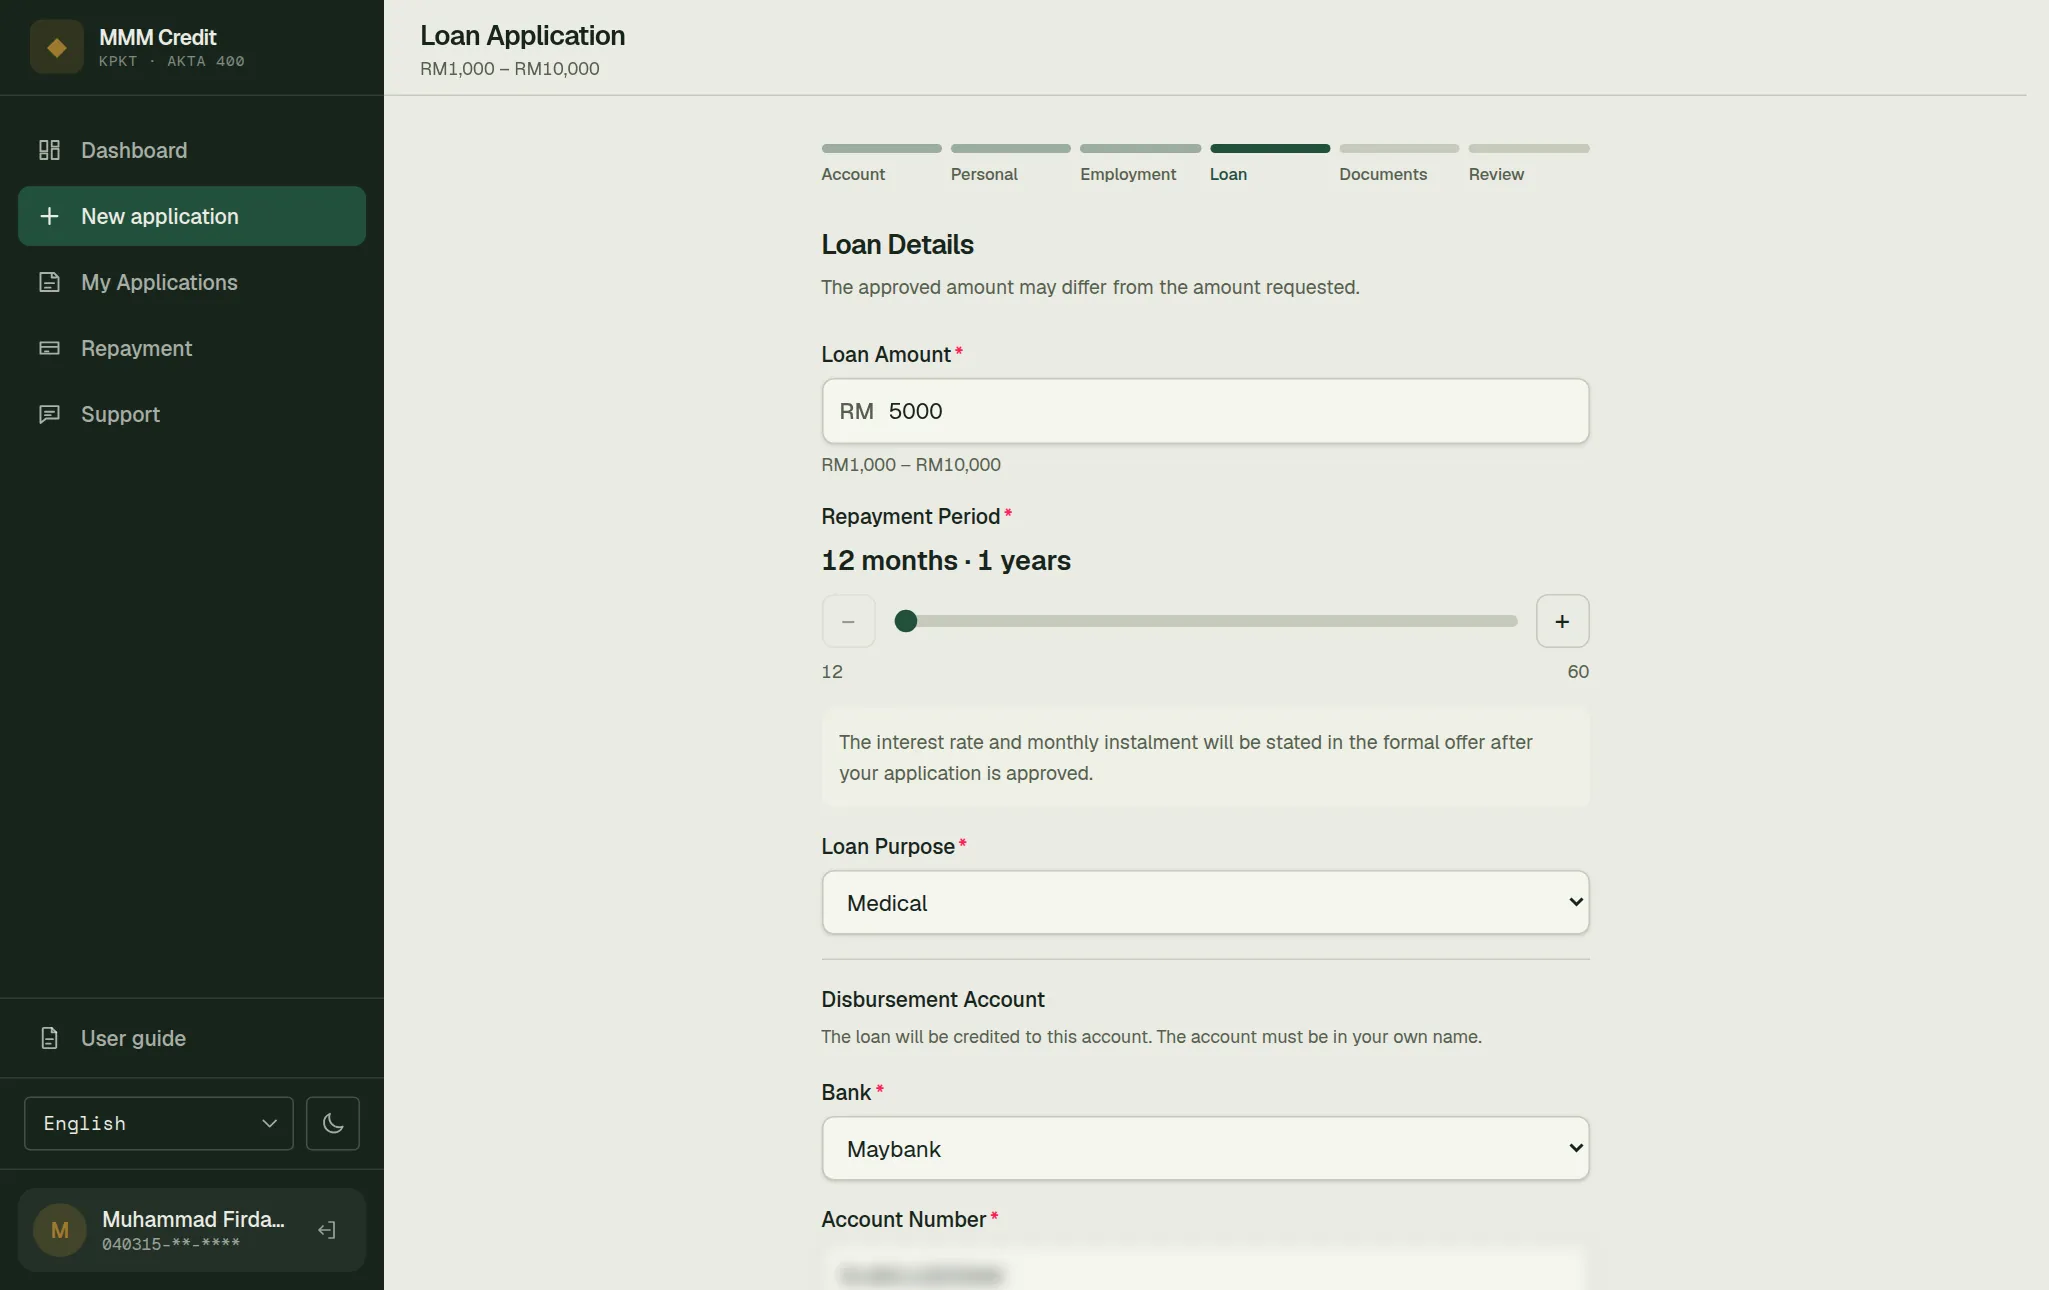
Loan Amount, Repayment Period and Loan Purpose — and, if you choose a purpose of Other, a Please Specify box. The form shows the range available for the amount and will not let you go outside it. Repayment Period is a slider, not something you type, so the range and where you are in it are visible at once; the reading beside it also gives the same number in years and months, because "41 months" is hard to picture.
The rate and the monthly instalment are not on this step, and the form says why: they are stated in the formal offer after your application is approved. Nothing here is a quotation.
This step also asks for your Disbursement Account — the bank account the loan will be paid into: Bank, Account Number and Account Holder Name. It must be an account in your own name, and the holder's name has to match the name on your IC.
Section 08
Step 5 — Documents
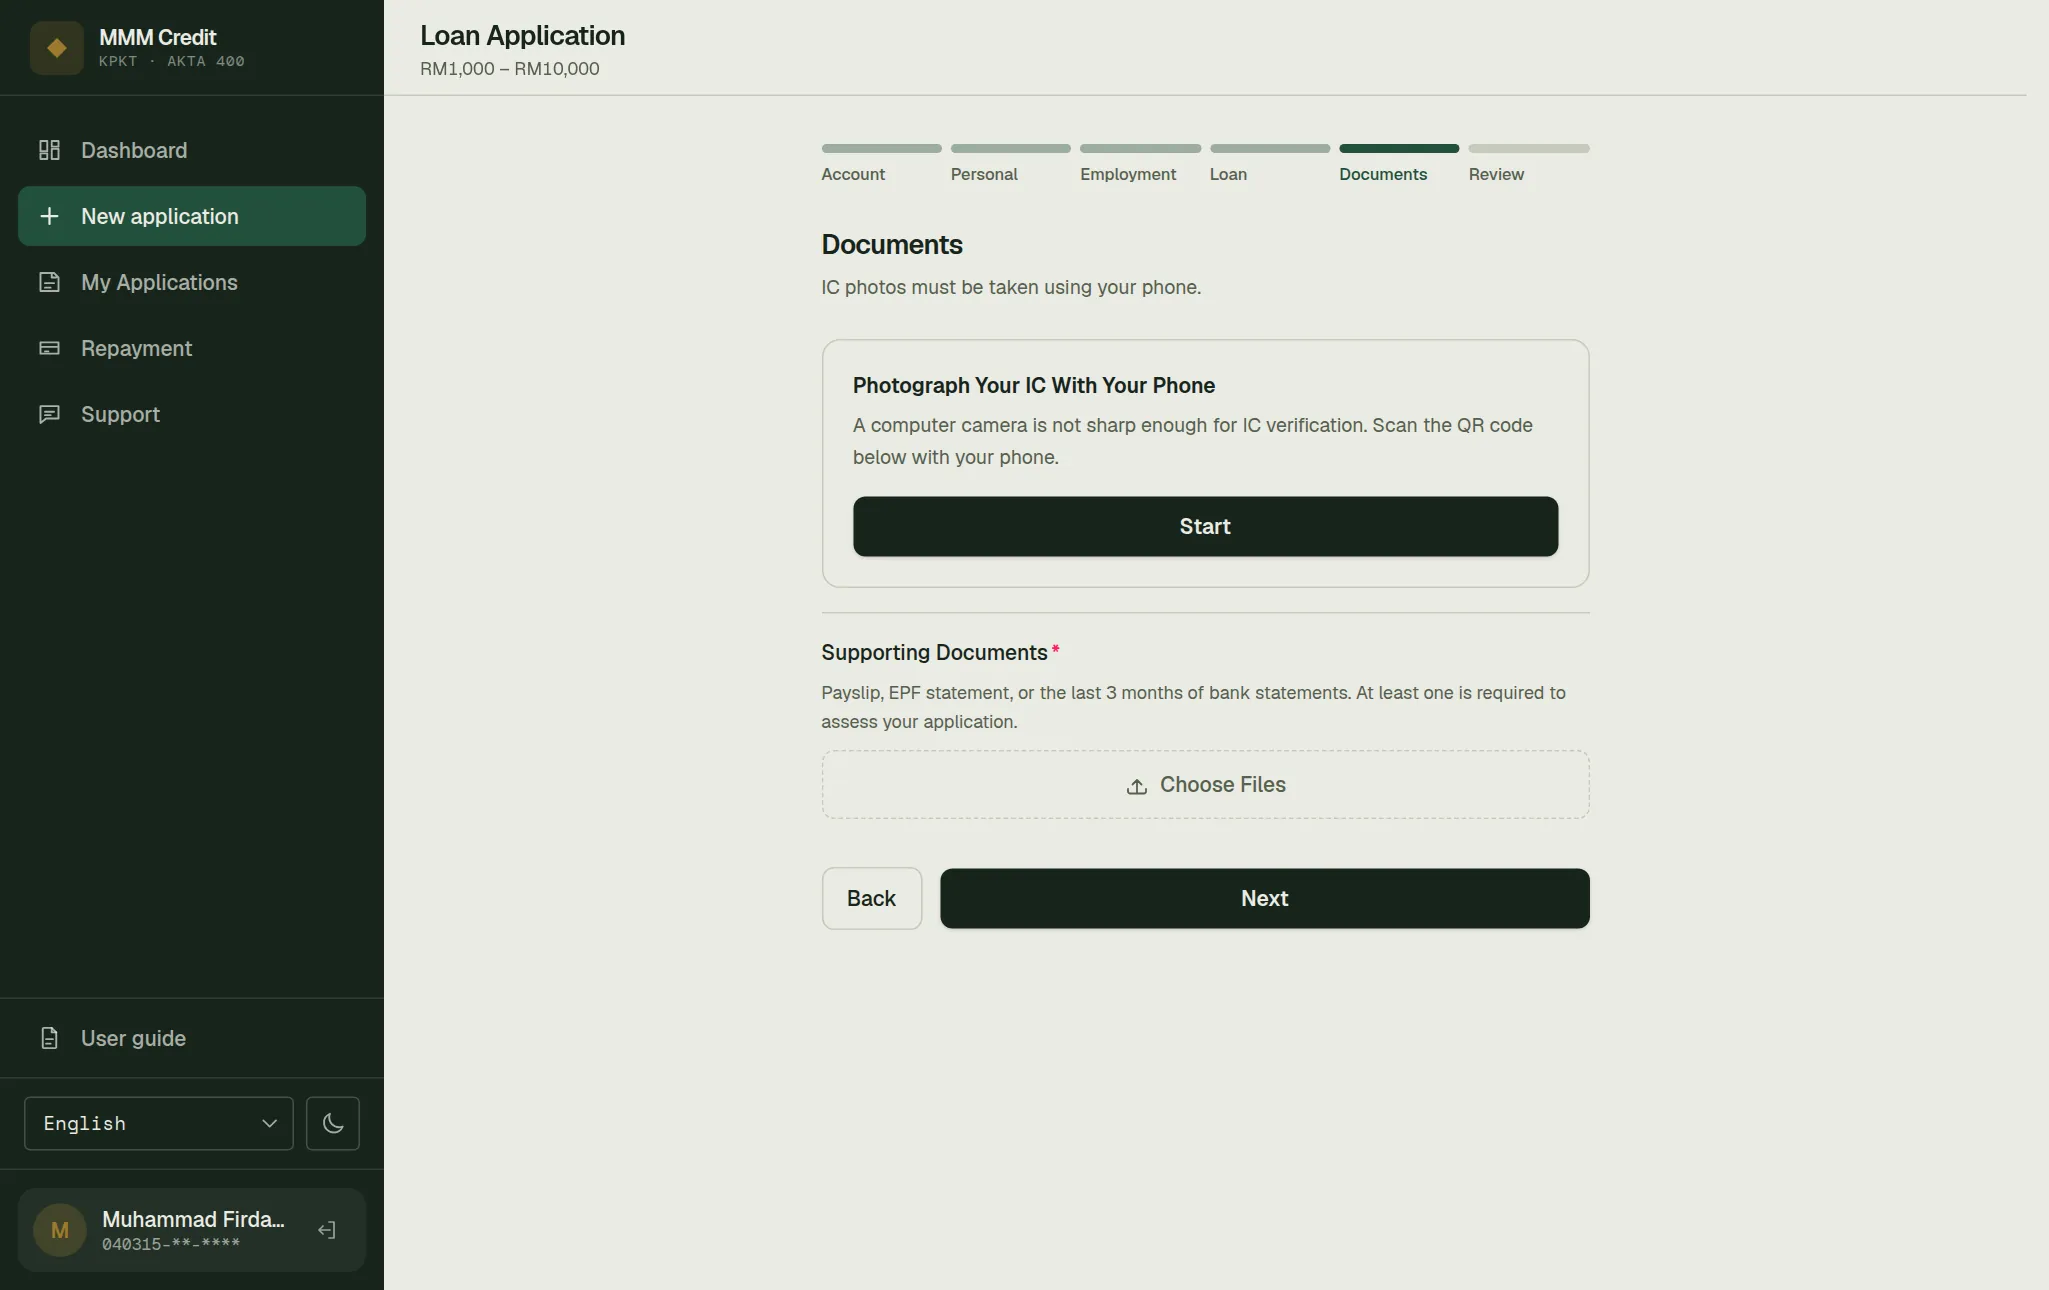
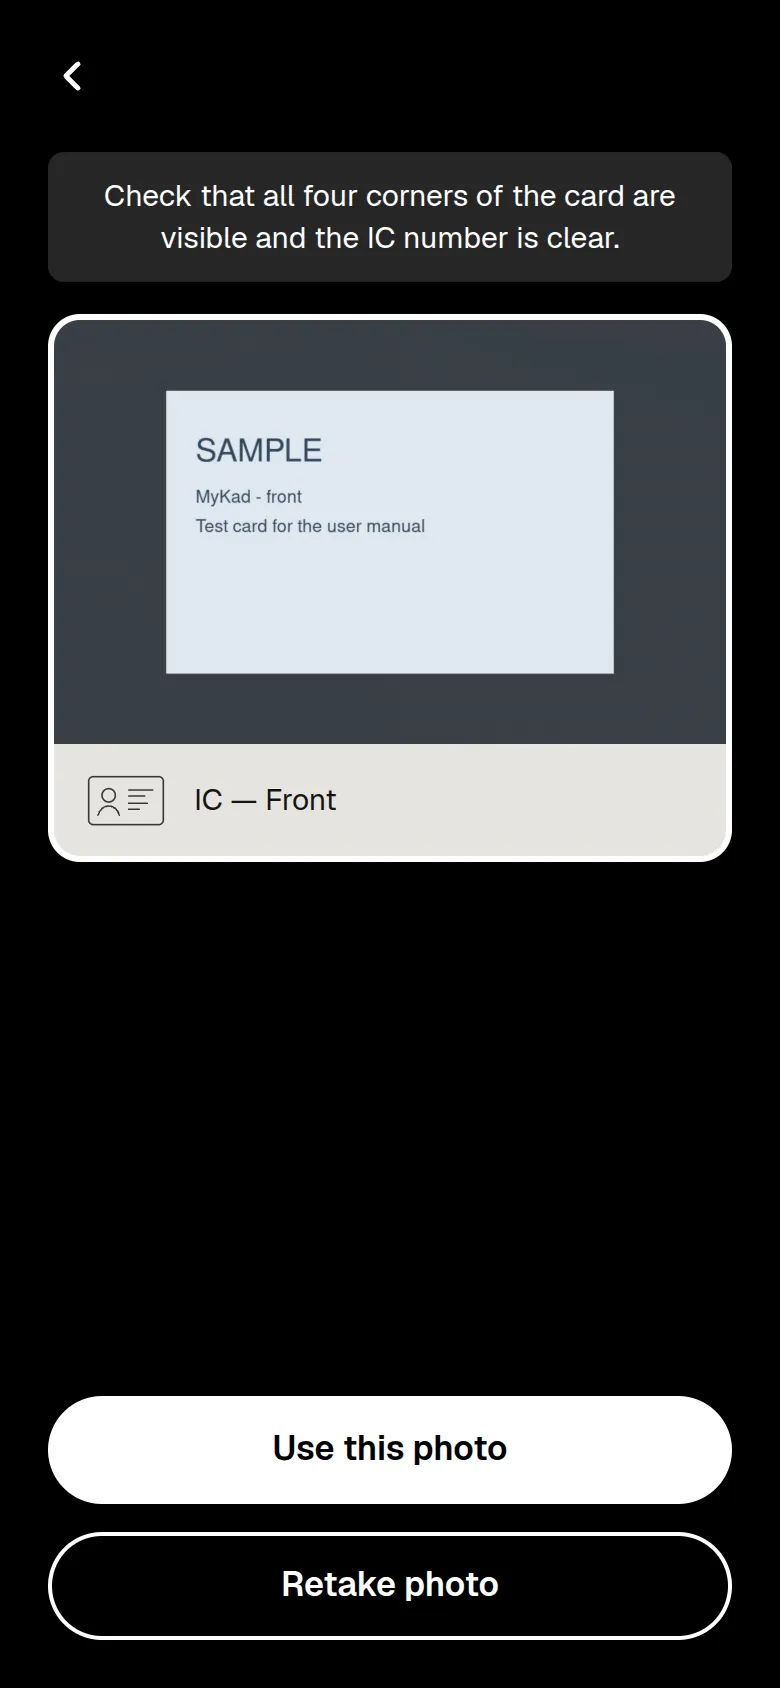
Your MyKad, front and back. These must be photographed live with your camera — you cannot upload a saved image.
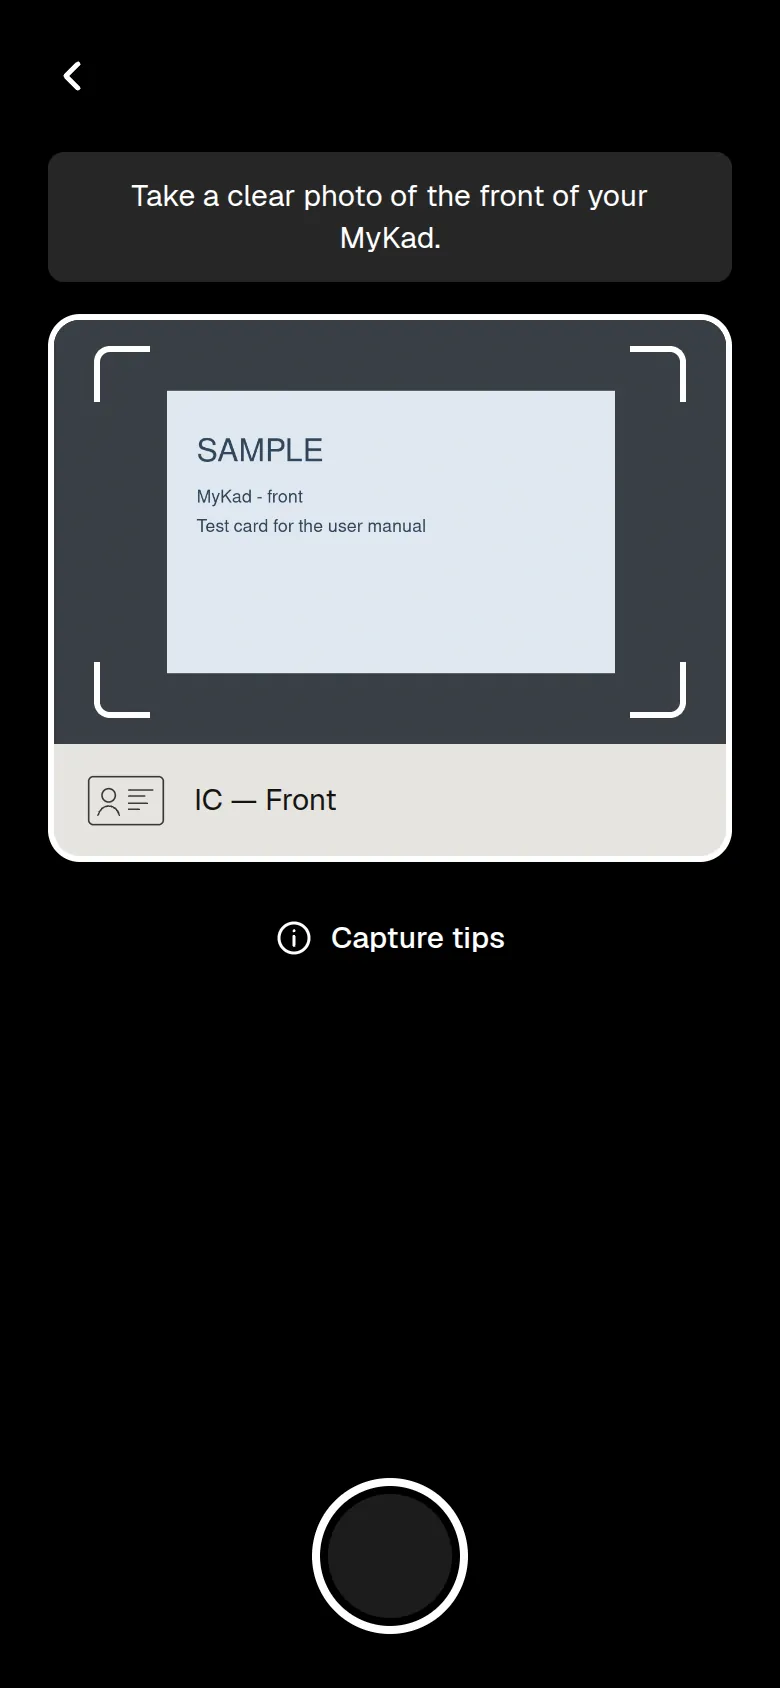
On a phone or tablet: press Take photos. The camera opens full screen and walks you through the card, one side at a time:
- A short screen says what to photograph; press the camera button to start.
- Fit the card inside the frame on screen and take the photo; the photo is cropped to that frame. Capture tips under the frame has three tips for a clear shot. Where your phone allows it, there are also buttons to switch to another lens and to turn on the camera light.
- Check the photo: all four corners of the card visible and the IC number clear. Press Use this photo, or Retake photo to take it again.
- Then the same for the back of the card.
You are back on the form, with the two photos shown small. To take them again, press Retake MyKad photos — if you close that window without finishing, the photos you already had are kept.
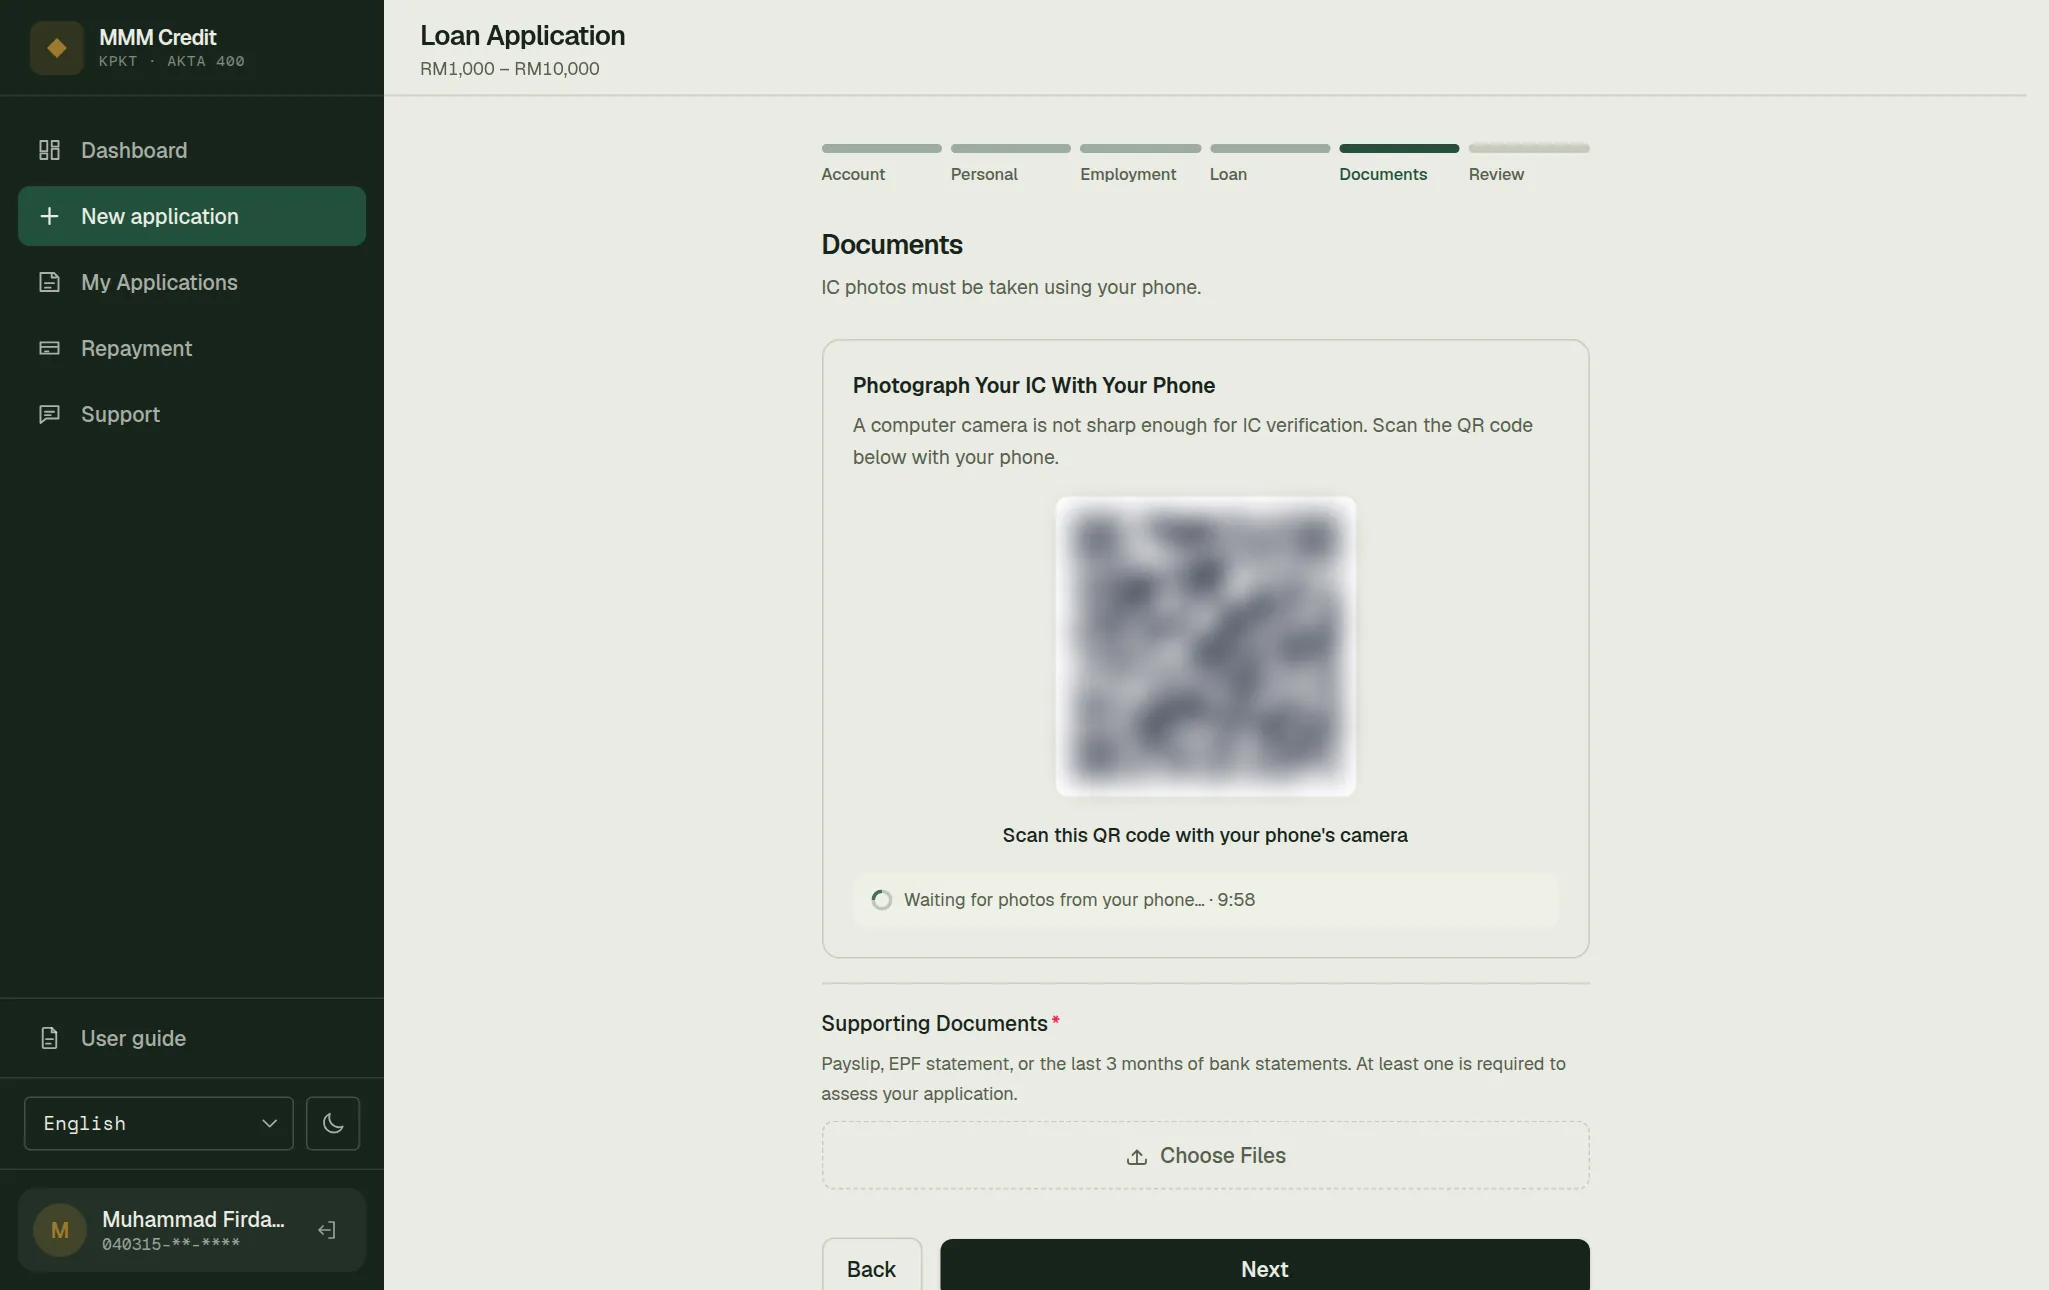
On a desktop computer: the page offers you a QR code instead. Scan it with your phone and take the two photos there; the phone shows the same screens as above. It may first ask "Did you switch from another device?" — that is expected, because you started on your computer; press Continue. When the phone says Photos Sent, go back to your computer: this page has picked them up by itself. To take them again, press Retake via phone.
The site checks each photo as you take it and will tell you if it is too dark, has glare, or is blurry. Retake it — a legible photo now saves days later. That check happens in your browser and never blocks you; it is a hint, not a gate.
One more check when you press Next. We may read the IC number off the front photo and compare it with the IC number on your account. If it does not match, or if the photo cannot be read at all, a card explains which of those it was — the number does not match the one on your account, no IC number could be read from the photo, the photo is too blurry to read, or the check could not be carried out just now — and offers you two ways on:
- Retake photo — back to the camera, with the old photos cleared so you genuinely retake them. On a phone the camera window opens again; on a desktop computer a fresh QR code appears by itself.
- My details are correct — submit anyway — carries on to the next step. Our team then reviews it, which the card tells you before you choose.
Three things worth knowing about that card, because it looks stricter than it is:
- It never rejects anything. It is a consistency check on a photograph, not a decision about you, and nothing on our side refuses an application because of it.
- It cannot be the reason you are stuck. If the check is unavailable or times out, you go straight through as though it had passed.
- There is no "fix my details" way out of it here, because your name and IC number come from your account and cannot be edited inside the application form. If they are what is wrong, leave the form, fix your My account or open a ticket under Support, and come back.
Supporting documents. A payslip, an EPF statement, or your last three months of bank statements. At least one is required. You may upload several; these can be files you already have, they do not need to be photographed live.
Section 09
Step 6 — Review & Submit
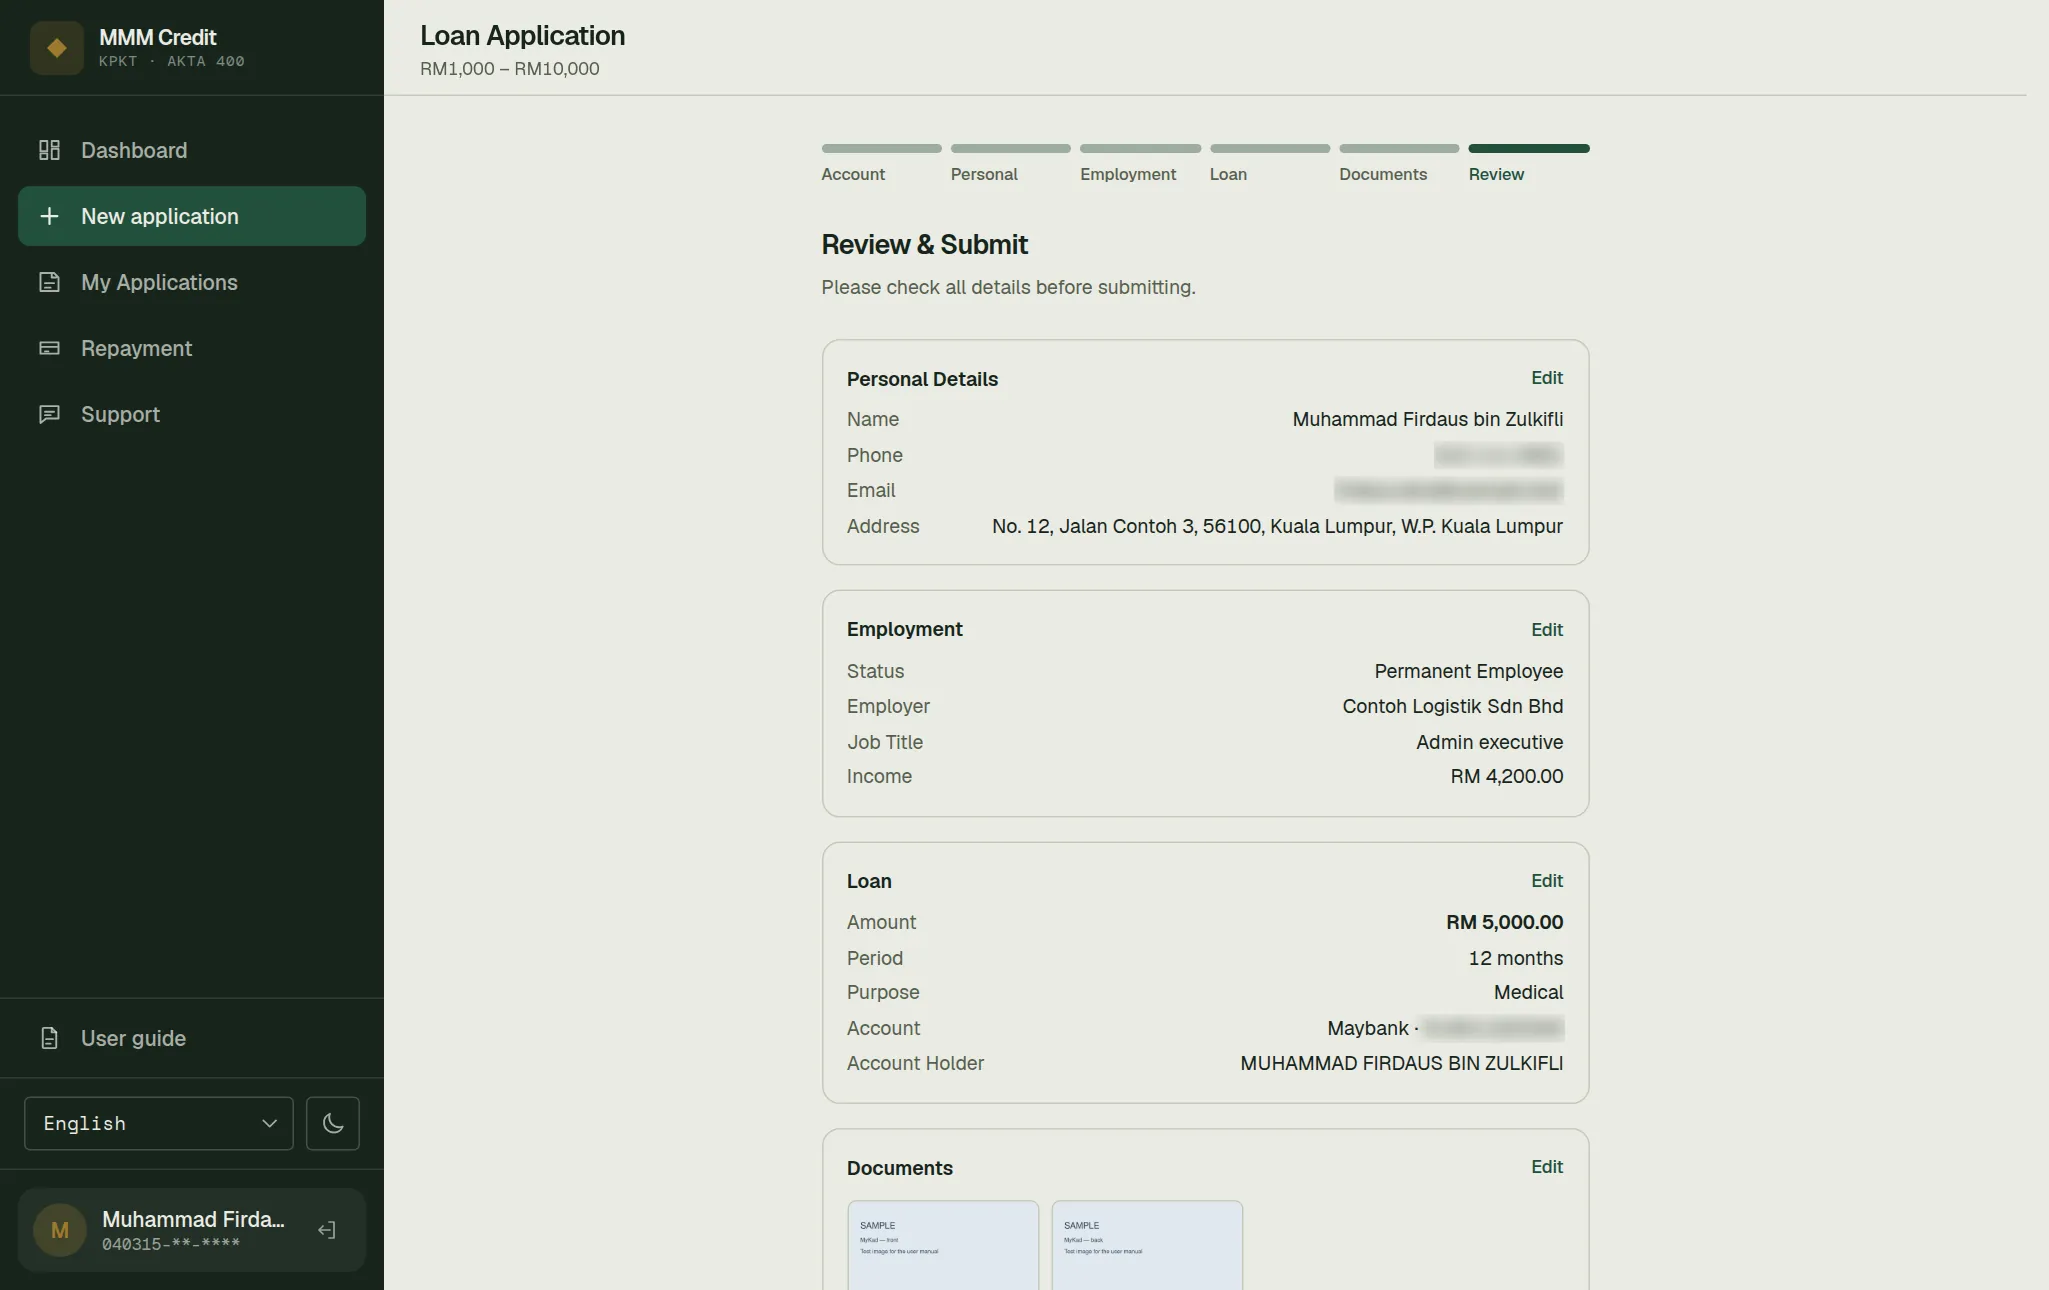
Everything you have entered, on one page, with your MyKad photos. Read it through — this is your last chance to correct anything.
Below it are the consents you must give, each with its own tick box:
- PDPA Privacy Notice — how we handle your personal data. Press Read in full to read the whole notice.
- Credit check consent — permission to obtain your credit report. Press Read in full to read the full wording.
- Identity verification consent — permission to verify your identity, including from a photo of your face if we ask you for one (chapter 7).
- Truthful declaration — that what you have entered is true.
- Marketing — optional, and it makes no difference to your application.
We keep a copy of the exact wording you agreed to, in the language you read it in, along with the date and time. If you ever need to see precisely what you consented to, we can produce it.
Then press Submit Application.
Section 10
After submitting
You are taken back to your dashboard, where the application appears as Under review with its reference number. Keep the reference number.
Nothing more is required from you unless your dashboard says so.
Still stuck?
Talk to us.
Use the Contact Us form. If you have an account, log in and open a ticket under Support in your account: our replies stay on the ticket.
Never put your password or a verification code in a message or a ticket. Our team will never ask you for it.